Diabotical Rogue.
As the primary graphics programmer on my first commercial game, I developed advanced rendering systems, shaders, and engine features while ensuring seamless integration with networking. Beyond graphics, I contributed to the editor, gameplay, and UI, optimizing performance and visual fidelity. My work ranged from implementing a custom decal system and advanced character shading to shadows, postprocessing, and DX12 rendering improvements.
Cascaded Shadows
Custom Decal System
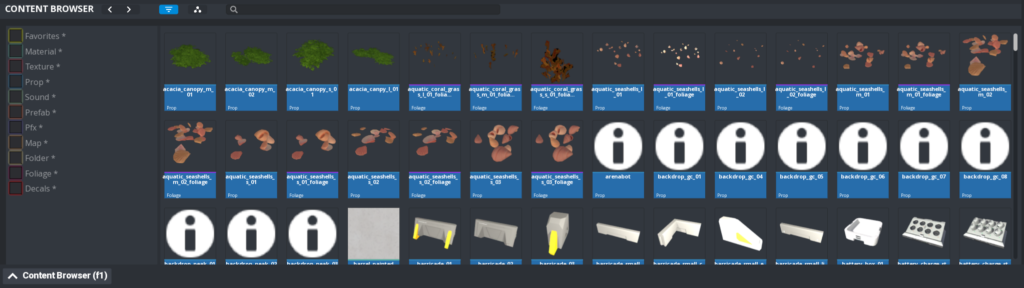
Content browser and Asset Structure
Valorant styled Weapon Preview
Engine Team Coordination & Technical Direction
Assisted in DX12 Integration
Deferred Rendering Pipeline Overhaul
Threaded Seamless Transition
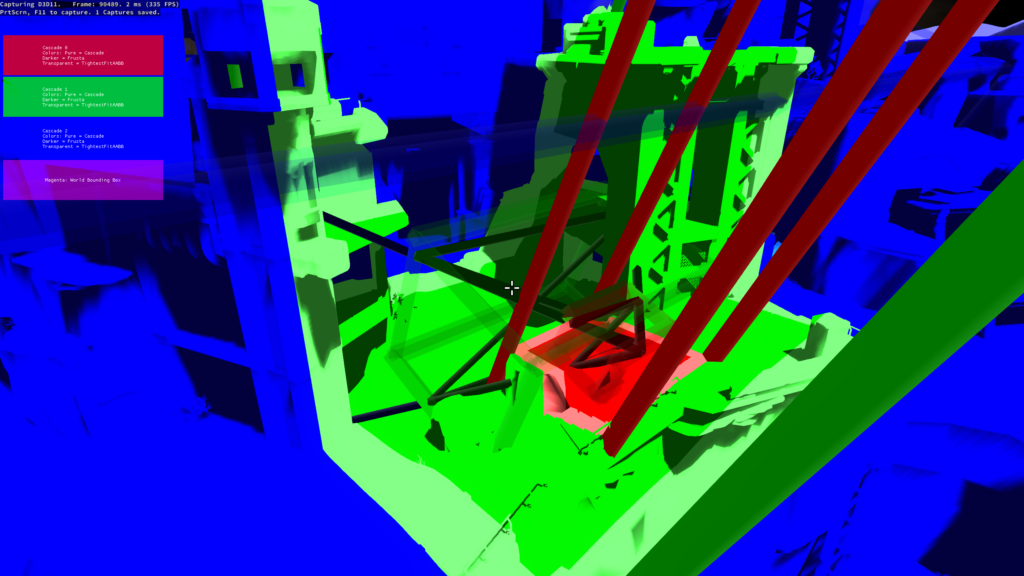
Cascaded Shadows.
When I joined, the shadow system had a few bugs and didn’t handle long view distances well — especially for FPS cameras. I rebuilt it using cascaded shadow maps, which fixed visual issues, improved performance, and made shadows look better across different camera types. Leading to better-looking shadows and faster performance in large scenes.
Generation of optimal cascades around camera frusta’s.
Fixed shadow edge jittering
Using various blending and biasing per cascade, minimized artifacts
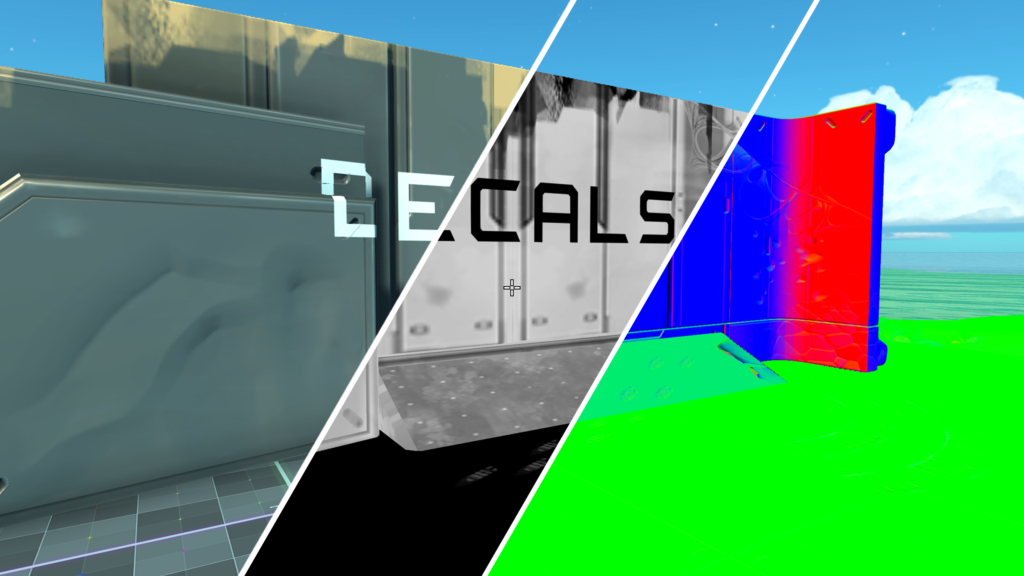
Decals.
Redesigned the decal system to support full material channel writing — albedo, normal, roughness, and metalness — instead of just albedo like before. Optimized for performance by minimizing state changes and using depth-based normal estimation to avoid read-write conflicts.
Enabled more dynamic in-game effects like footprints and explosion marks, while keeping the system lightweight and flexible.
Combinations
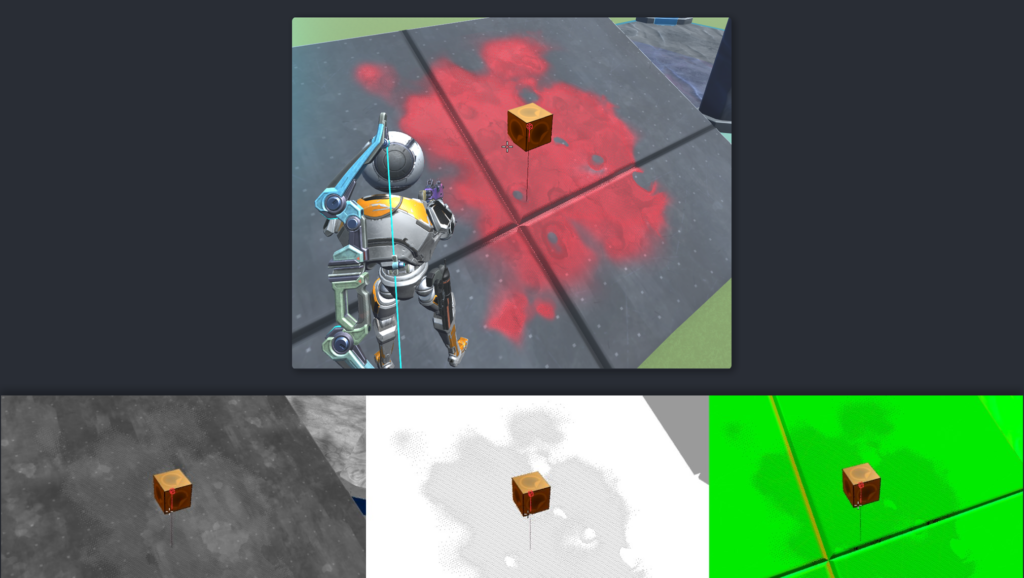
The biggest challenge with deferred decals, especially when trying to pack the gbuffer as tightly as possible, is implementing alpha blending. To achieve a smooth transition between nothing and something in the textures, alpha blending is essential. My first approach was to use dithering with a Bayer pattern, which worked decently, particularly when dealing with metalness. However, the real breakthrough came when I started experimenting with sample states.
I discovered that you can use a single texture’s alpha channel for alpha blending across all your textures. Since the material ID, which was packed into the alpha channel of the albedo, was barely being used, I decided to repurpose that channel for alpha blending—and it worked like a charm. This also opened up the possibility of combining blend-state writes based on the material property we wanted to apply, rather than relying on shader work and frequent state swaps.
Normal Estimation From Depth
For the decals, we needed to map normals onto the surface using a TBN (Tangent, Bitangent, Normal) matrix. We can already get the normal from the gbuffer, but the issue is that we can’t read and write to the same render target. Copying the gbuffer would work, but it’s not efficient. Instead, I opted for a technique that estimates the normal based on depth differences between adjacent pixels using pixel derivatives (ddx & ddy). The normal can be calculated by taking the cross product of these derivatives.
To complete the TBN matrix, we also need the tangent and bitangent. These can be derived using the texture’s UV coordinates. By calculating the partial derivatives of the UVs (ddx and ddy), we can determine the rate of change in the x and y directions, which gives us the tangent and bitangent, respectively. With these, we can form the full TBN matrix (tangent, bitangent, normal) and correctly map the decal normal onto the gbuffer without needing additional render targets.
More detailed explanation of the technique
With a combination of these articles, I came up with a solution that would suit our needs.
Accurate Normal Reconstruction From Depth
Volume Roads
Fixing screen-space deferred decals
bool get_tbn_from_pos_and_uv(float3 P, float2 uv, inout float3x3 TBN, inout float3 extra_normal)
{
    float U = uv.x;
    float V = uv.y;
    float3 dPdx = ddx(P);
    float3 dPdy = ddy(P);
    float dUdx = ddx(U);
    float dUdy = ddy(U);
    float dVdx = ddx(V);
    float dVdy = ddy(V);

    bool success = true;
    //We can solve for dPdU/dU and dPdV/dV only if the determinant of the system is nonzero:
    float det = dUdx * dVdy - dUdy * dVdx;
    if (abs(det) <= 0.0) //0.000000001f //0.00000001f
    {
        TBN = float3x3(0.0, 0.0, 0.0, 0.0, 0.0, 0.0, 0.0, 0.0, 0.0);
        extra_normal = float3(det, det, det);
        success = false;
    } else {
        //By the chain rule, we have the linear system:
        //dPdx = (dPdU/dU) * dUdx + (dPdV/dV) * dVdx
        //dPdy = (dPdU/dU) * dUdy + (dPdV/dV) * dVdy
        //We want:
        //T = tangent = normalize(dPdU/dU)
        //B = bitangent = normalize(dPdV/dV)

        //Note that we can drop the determinant scale factor since we will normalize T and B anyway.
        float3 T = dPdx * (+dVdy) + dPdy * (-dVdx);
        float3 B = dPdx * (-dUdy) + dPdy * (+dUdx);
        T = normalize(T);
        B = normalize(B);
        float3 N = normalize(cross(T, B));

        extra_normal = N;
        TBN = float3x3(T, B, N);
    }

    return success;
}

Asset & Content Browser.
Reworked the asset and material system to better support level designers, artists, and future modding — focusing on flexibility, scalability, and workflows similar to modern engines.
Also redesigned the content browser with a new hierarchical UI, parent-child relationships, and smart scaling — inspired by Unity and Unreal for a smoother user experience. This in turn made it easier for the team to manage assets and build faster.
Impact On Development & Workflow
Before, our pipeline was tightly integrated with Blender, which caused a significant issue: every time an artist re-exported their models, the asset files would be overwritten. This became problematic because any changes made by the engine or editor would get overwritten on the next export. To solve this, we needed to shift the workflow to be more engine/editor-centric rather than relying on Blender. This was especially important because future modders may not have access to the same Blender tools, potentially preventing them from creating or modifying assets.
Technical Improvements
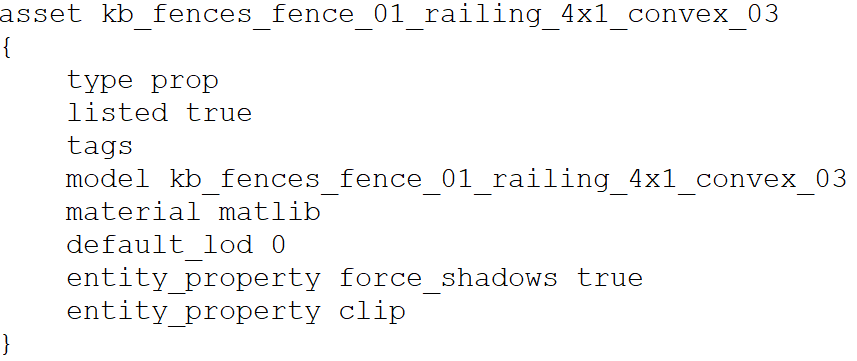
Because everything now had a corresponding .asset file, renaming, tagging, instanced material and much more was possible.
Before we were reliant on perfect string matching, which was a big issue since our artist expressed the need to be able to rename assets for organization.
Scalability & Future Proofing
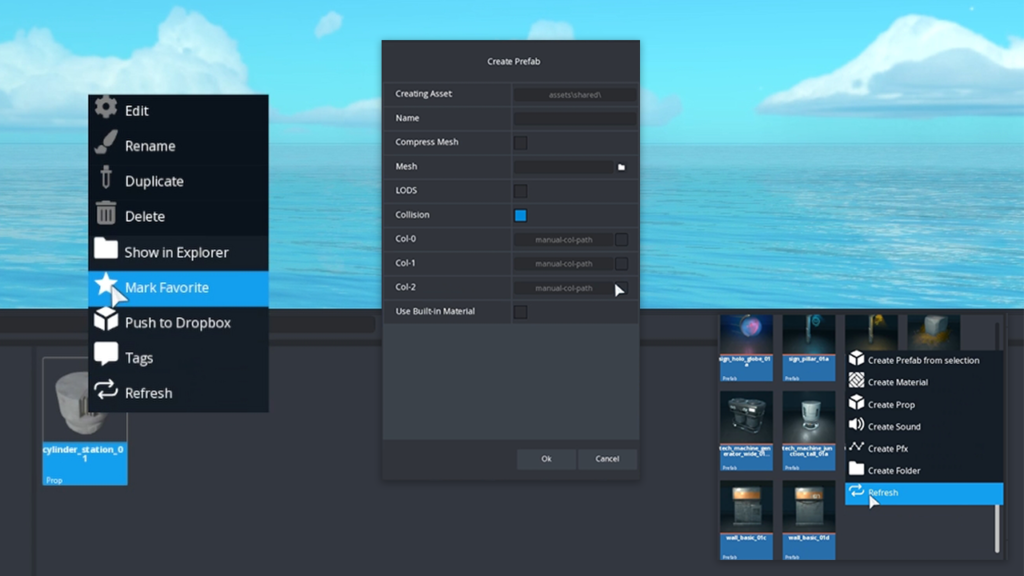
Asset Panel
The content browser was completely remade for scalability and modding support. I redesigned the asset panel to allow dynamic resizing both horizontally and vertically, using a parent-child system similar to Unity/Unreal. This system enables flexible panel layouts and is crucial for future feature expansion.
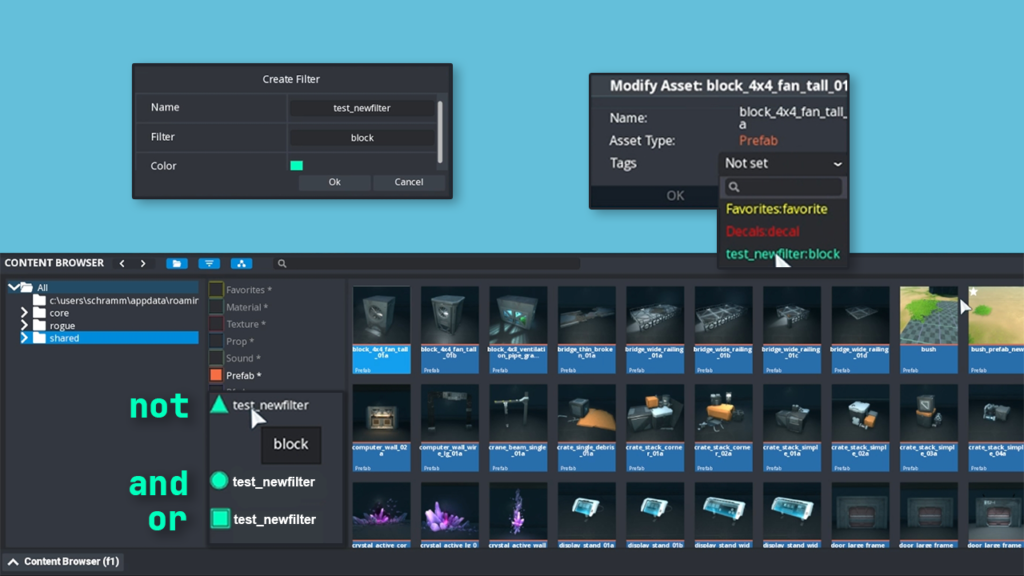
Filter Panel
A key focus was the filter panel, which designers loved. It supported hardcoded filters, but I added the ability to make your own regex filters for assets, allowing both default and custom filters. This flexibility also means new assets can adopt these filters, making it a powerful tool for asset management.
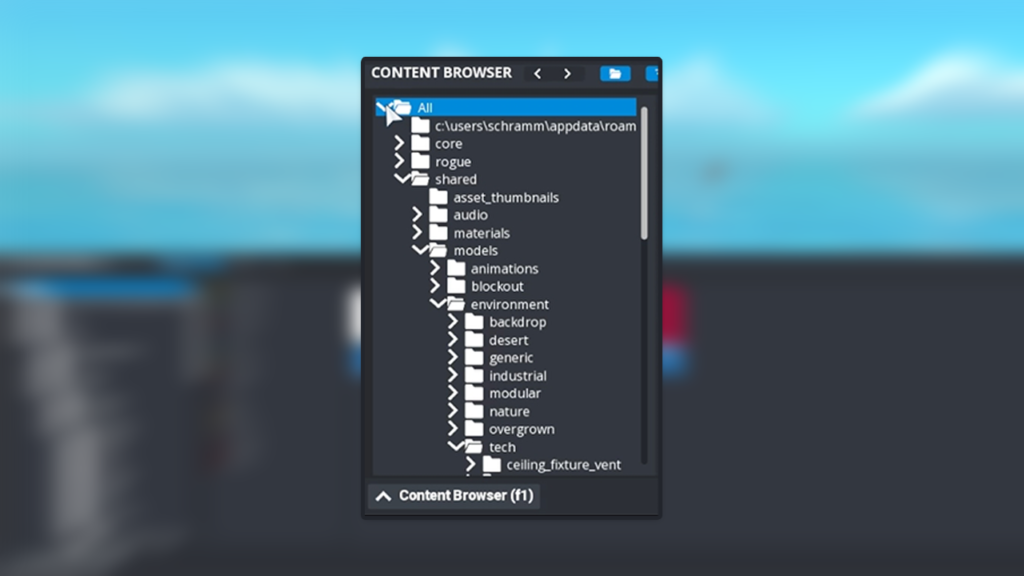
Folder Panel
The folder panel was the most challenging part, as our UI lacked dynamic dropdowns. I built a hierarchical dropdown system that could dynamically display folders and assets. This system also supports adding/removing folders, and for modding, users can easily add their own assets to the panel. Additionally, we can make GD Studios’ assets non-editable for modders while still allowing full use.
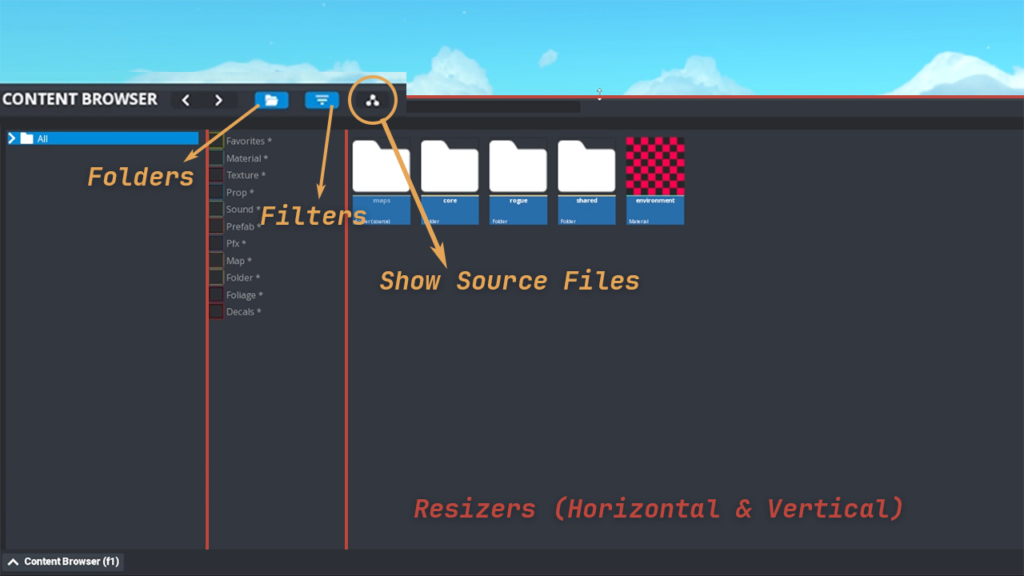
Resizing and Tab Management
The entire system also supports flexible tab management, allowing new tabs to be added or removed dynamically. Resizing, both horizontally and vertically, is now fully supported across the UI, ensuring future scalability.
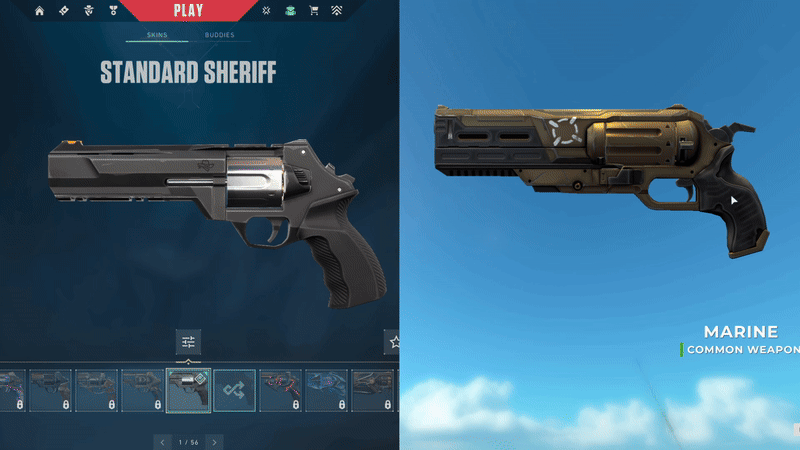
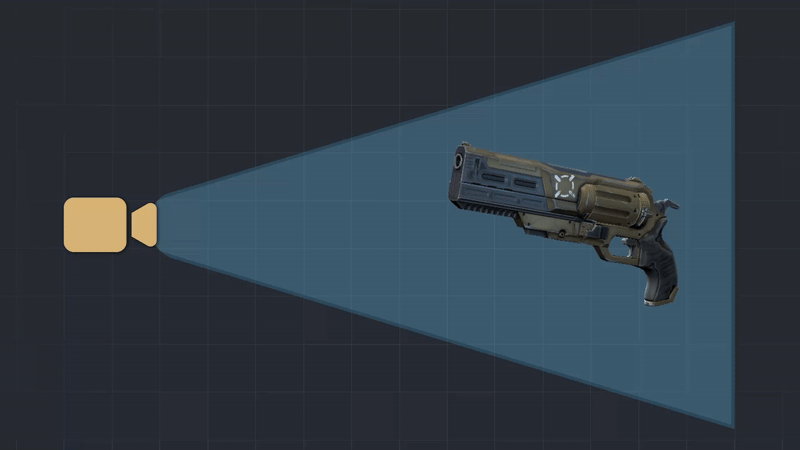
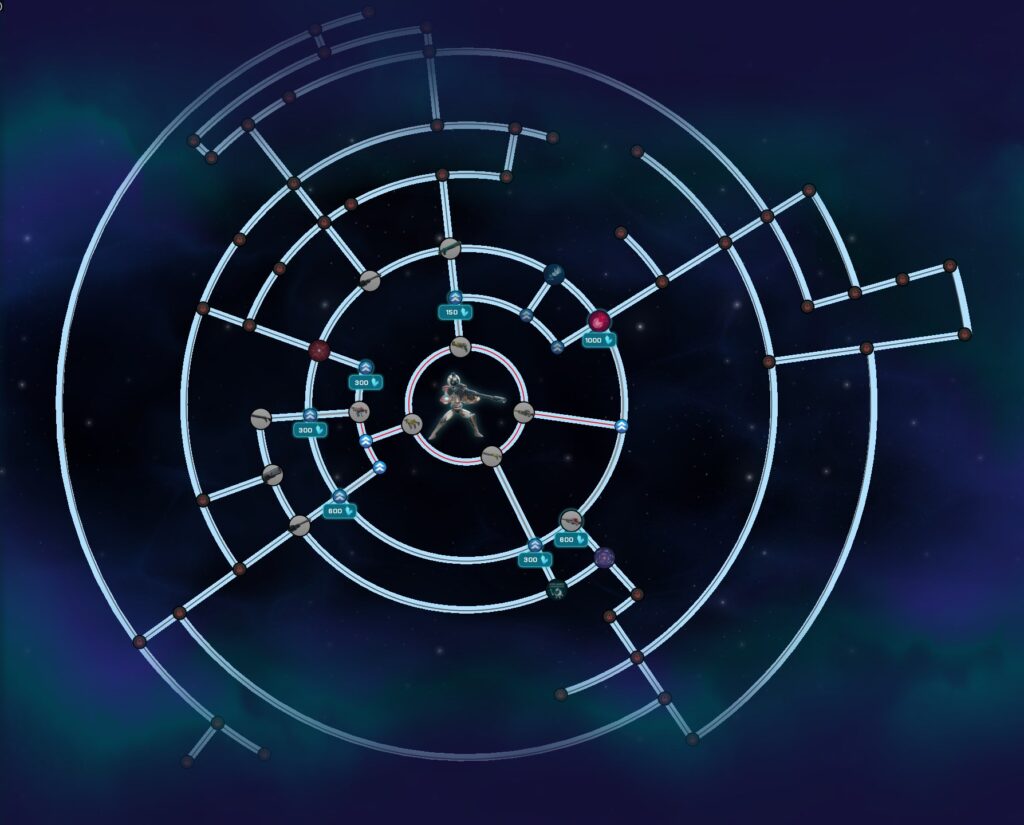
Locker & Progress Tree.
Built a real-time weapon preview system with a custom camera setup inspired by Valorant, using Gameface for UI integration. Also created visuals and effects for the progression tree.
Worked closely with backend to ensure smooth networked previews and responsive interactions. Which resulted in a polished, responsive system for skin selection and unlock progression.
Rendering Archetecture
The first and biggest issue with rendering any models seperate like this is that there was no way to do it. No scene system, no camera system, everything went throught one way and was very hard to adjust. Previously for showcases in OG Diabotical another scene was used. Still wanting to use the same rendering system, and not needing seperate map for it, I opted for a virtual camera solution. Passing in a camera into the rendering system would allow me to only render specific models, to specific render targets like a camera. I made it possible to choose weather you wanted various post processing effects per camera aswell.
scene::BasisVecs cam_vecs = scene::get_camera_basis_vecs();
calculate_model_position_in_frustum_custom(scene::camera->position, cam_vecs.forward, cam_vecs.right, cam_vecs.up, _curr_preview_model);
update_curr_node_matrix(_curr_preview_model, scene::camera->rotation, _extra_rot_matrix);
_locker_camera.postprocess_settings.want_bloom = false;
_locker_camera.postprocess_settings.want_blur = false;
_locker_camera.postprocess_settings.want_tonemap = false;
_locker_camera.postprocess_settings.want_cc = false;
_locker_camera.postprocess_settings.want_aa = false;

_locker_camera.render_texture.clear_render_target(0, 0, 0, 0);
scene::render_nodes_with_custom_camera(_locker_camera, _curr_preview_model, true, "locker_model-DEFERRED");

_locker_camera.render_texture.set_as_target(nullptr);
scene::render_nodes_with_custom_camera(_locker_camera, _curr_preview_model, false, "locker_model-FORWARD");

bool ignore_aa = _locker_camera.postprocess_settings.want_aa;
ignore_aa = false;
if (paste_to_bb)
    render::paste_to_back_buffer(_locker_camera.render_texture, V2(_rt_pos_on_screen_x, 0), ignore_aa);
Working out Where It Should Be?
Once the model was rendering, it needed to be rendered at the correct position and perfectly fit inside the frustum, to take up as much space as possible, while still being able to be rotateded etc.
We want to figure out distance (d) from camera.
We will need some way to specify the exact size of the object, in this case a bounding box.
We also need the fov. With those parameters we can use pythagoras theorem and trigonometry to figure out d. And this will work for any size of object, and position it properly in the frustum, not cutting out anything.
Getting Spaces and Rotation Correct
The next feature is adding ability to rotate the weapon in order to spectate it properly. But because we want to do that, we need to make sure the previous calculation take this into consideration when selecting its bounding box.
For the rotation to work correctly, we could use the center of the object as the center of the space, but in this case, we didn’t have that luxurious. Because the first thing we needed was to position the node from worldspace, to the correct position in front of the camera, which is a camera somewhere in the world.
Futureproofing the system
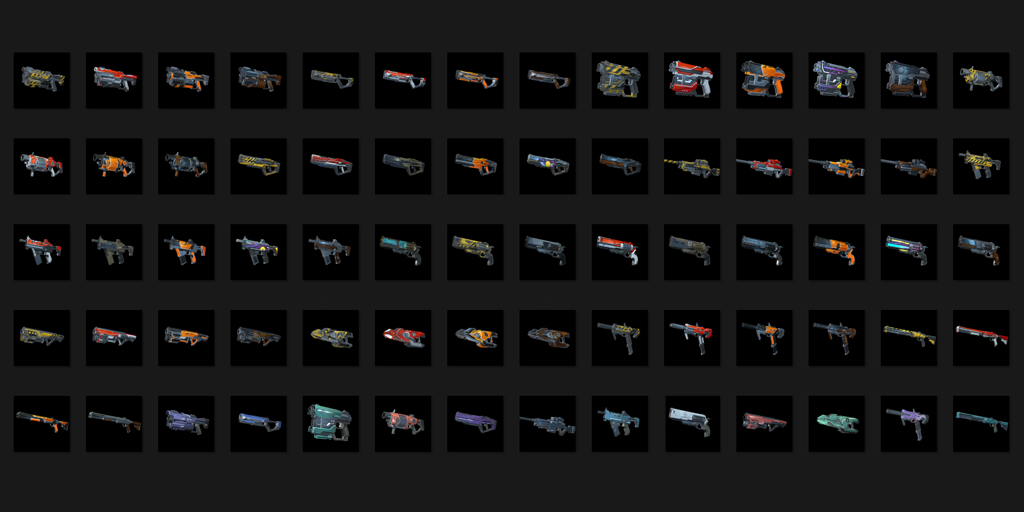
One thing that quickly came up was the need to make all the thumbnails for the weapons. If they were hand drawn or rendered in blender, they woudn’t have the same light condition, and look out of place. So I made a way for artist to utalize the locker to take screenshots of the weapons with whatever rotation, scale and zoom they wanted, then that thumbnail would be applied to the weapon.
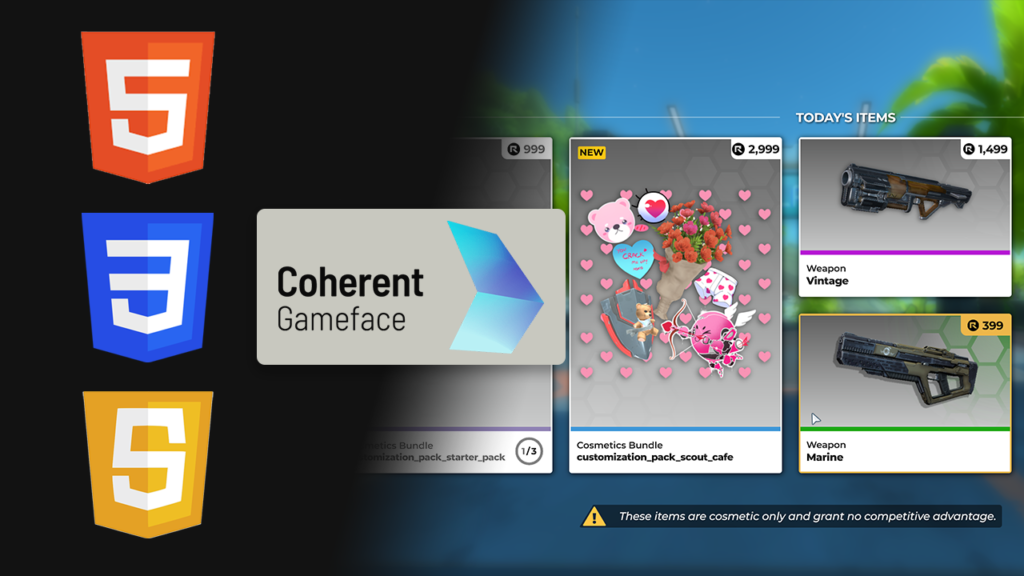
Coherent Gameface
While working on Rogue, I built the locker and shop screens using primarily JavaScript, CSS, and a bit of HTML.
These were built on top of an existing Coherent Gameface integration originally set up for Diabotical.
By combining engine knowledge and reading up on coherent documentation, I delivered higher-fidelity screens with performance in mind.
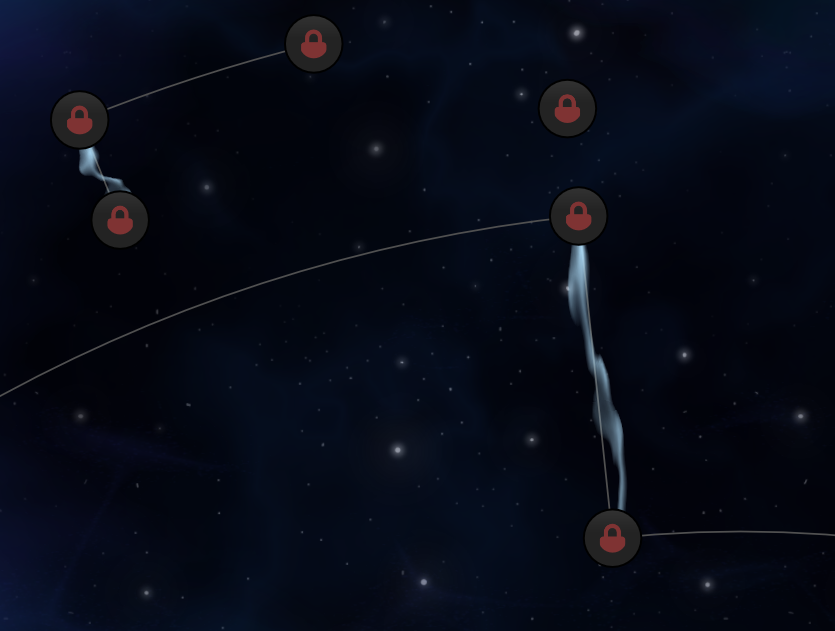
Progression Tree
The progression tree needed a way to look better. Using referances like DOTA, we figured having growing and shrinking bits of energy in between the nodes would give the player more satisfaction when unlocking new nodes.

Straight Mesh Generation
I started of with the straight meshes. Using the start & end point the scale of the mesh was easy to find out, and creating vertices and indices was even simpler.
The issue arose when needing to scale these based on the amount of zoom, but also making sure the pivot of the mesh was correctly set, so with animations and uvs, the pfx could look like they were traveling along the path.
Curve Mesh Generation
The curved meshes presented scaling and zoom issues similar to the other meshes, but they introduced additional complexities. The curve’s angle was defined by a start and end angle, and I needed to calculate the correct angle when the pivot was at the starting node. This required handling cases where the angle span exceeded π, in which case I had to adjust the direction of the angle span to ensure proper positioning.
Furthermore, generating UVs for the curved meshes involved considering the tangents in both the x and y directions, which were derived from the sine and cosine of the angle. This allowed for accurate texture mapping along the curve, ensuring that the UV coordinates corresponded correctly to the mesh’s shape and curvature.
float angle_span = (end_angle - start_angle);
if (angle_span < -TRIG_PI) {
    angle_span += 2 * TRIG_PI;
}
if (angle_span > TRIG_PI) {
    angle_span -= 2 * TRIG_PI;
}
float angle_increments = angle_span / curve_segments;

int vertex_id = 0;
for (int i = 0; i <= curve_segments; ++i) {
    float angle = start_angle + i * angle_increments;
    float cos_angle = std::cos(angle);
    float sin_angle = std::sin(angle);
    float fudge_factor = (V2(X_RADIUS_FUDGE_FACTOR, 0.0) * cos_angle + V2(0.0, Y_RADIUS_FUDGE_FACTOR) * sin_angle).length();
    float radius = unfudged_radius * fudge_factor;

    float x_curve = radius * cos_angle;
    float y_curve = -radius * sin_angle;

    float tex_u_top = 0.0f;
    float tex_u_bottom = 1.0f;
    float tex_v = (float(i)) / float(curve_segments) * length_radius;

    float tangent_x = -radius * sin_angle;
    float tangent_y = -radius * cos_angle;

    float length = std::sqrt(tangent_x * tangent_x + tangent_y * tangent_y);
    float tangent_norm_x = tangent_x / length;
    float tangent_norm_y = tangent_y / length;

    float normal_x = -tangent_norm_y;
    float normal_y = tangent_norm_x;

    // Adjust vertex positions for squared shape
    float top_x = x_curve + normal_x * half_thickness;
    float top_y = y_curve + normal_y * half_thickness;
    float bottom_x = x_curve - normal_x * half_thickness;
    float bottom_y = y_curve - normal_y * half_thickness;
    vertices[vertex_id] = VertexPNGT(top_x, top_y, 0.0f, tex_u_top, tex_v); // top arc
    vertices[vertex_id + 1] = VertexPNGT(bottom_x, bottom_y, 0.0f, tex_u_bottom, tex_v); // bottom arc
    vertex_id += 2;
}
Animation, Timing & Scaling
To get a progression tree to look polished, animations & timing needed to be on point, together with out vfx. I worked close with our vfx and audio artist to figure this out. Fading in and out sounds, scaling meshes depending on the size of the monitor/zoom.
The latter which was next on the list.
Since the vertices was generated in screen space, alot of adjustments were needed to get the shapes to align and scale correctly.
Core Engine & Tooling Contributions.
Took ownership of unglamorous but critical graphics and tooling systems, including asset pipeline reliability, shader cleanup, UI integrations, and editor UX bugs.
Which helped reduce QA time and improved iteration speed across multiple departments.